We spent last year completely re-coding our back-end video platform to make it more scalable using a video rendering engine built on top of Amazon web services. This added reliability to produce smoother, more cinematic video and scalability to handle hundreds, or even thousands of videos a day. Now, we have completely recoded the front-end editor you use to create the videos.
See the overview video or read below for key features.
Key Features. The new editor is built using modern code and comes with these benefits highlighted below:
Upgraded size to HD - 720P standard
NO Adobe Flash, which means you can use your iPad to edit the photo order and create a video. The old editor required Flash.
Simplified Intro/Exit branding slides that pull from your profile info & can be shown independently of each other
Ability to add photos or even ready to use video clips and sequence them into the timeline (video clip audio support coming soon).
Auto syncing of the floorplan images that can be inserted in the video. If a room name changes, it automatically updates the video. At this time floorplan images are not shown in the photo gallery because of redundancy - but see the video for a work around. Seed feedback to issues@floorplanonline.com )
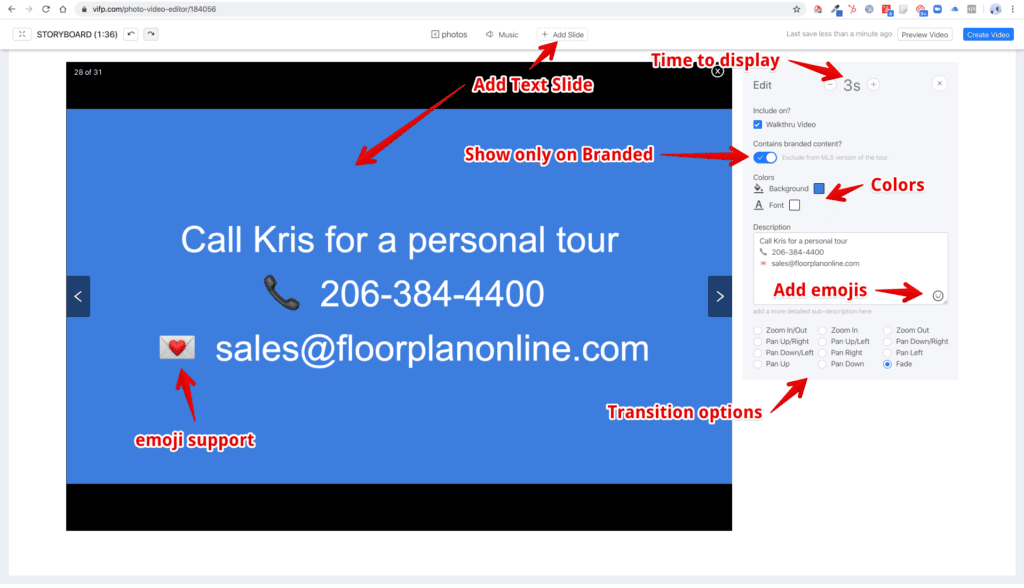
Add a Text Slide to help communicate a space or feature. This is similar to the text posts you see on Facebook, and it includes the ability to add in emojis. 😉 You can also use this to create a custom branding or co-listing slide and select to show it ONLY on the branded version of the video we create (so you do not get in trouble with your MLS and their unbranded requirements. 💡 See example below.
Auto saves - no more save and preview or save. It just does it.
Video length indicator
Multi-select images - use SHIFT+Click to select
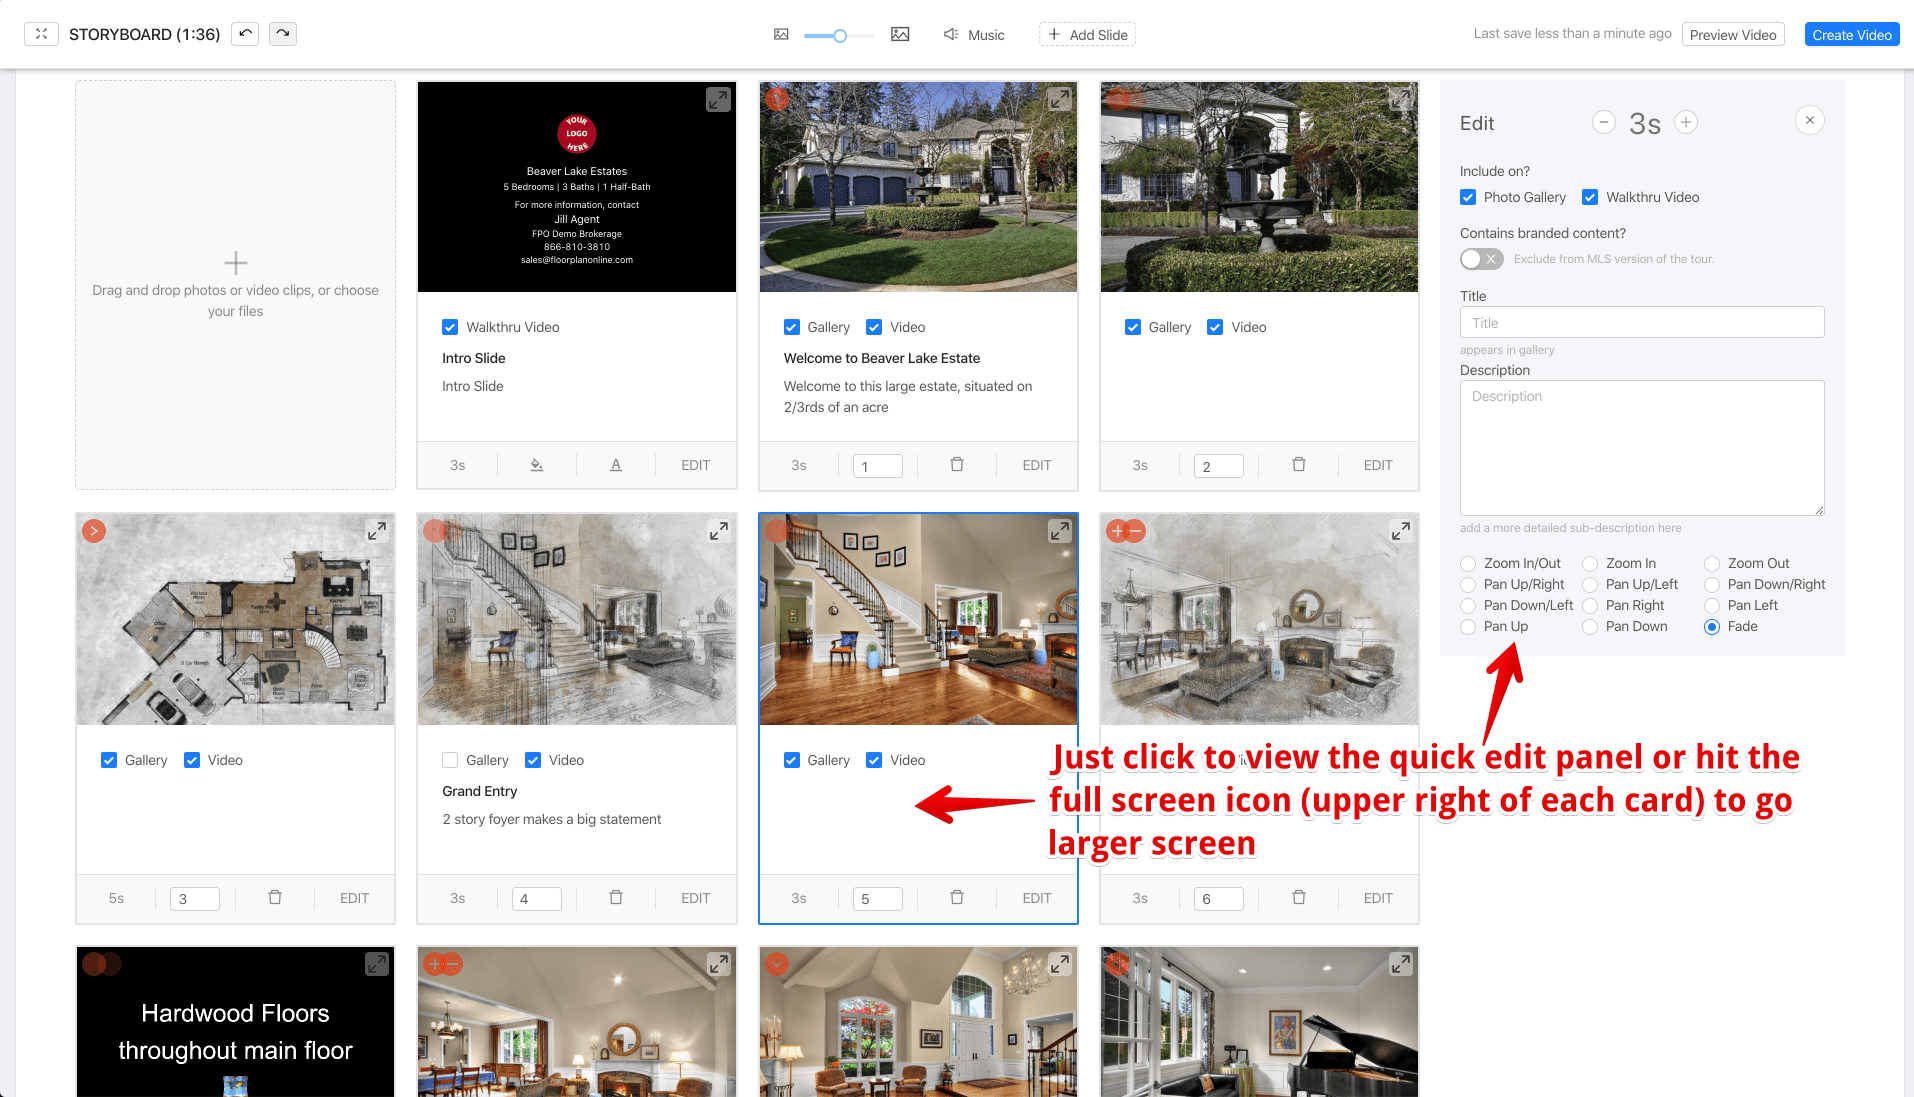
Quick editing panel for everything you can change on each media card. See example below.
View Preview - a small video is rendered within 1-2 minutes for quick preview of your edits. Produce the Tour and Create Video to generate final video.
Video is automatically added to your tour with an unbranded version too, and it is available for download under the Marketing Center so you can upload it to social media. We automatically post it to YouTube, your channel or ours.
This is the text slide editor so you can create any kind of custom slide and inject into the video timeline.
Click the photo (media card) to show the quick edit panel for each media item.
Floor Plan images are automatically updated when changes are made to the floor plan (under Edit FloorPlan). Only available in the video timeline for now.
How to use the new editor on older tours.
The new video editor is available on all tours produced beginning after April 12th. If you would like to use it on an older tour, you can. Here is what you need to do. Just know there are some features like the floorplan sync and the text slides that are not supported in the old editor, so if you use this, you need to use it going forward for that tour.
The "back-door" way to use the new video editor - when logged into your account, just open a new tab and use this URL:
https://vifp.com/photo-video-editor/xxxxx where the xxxxx is equal to your tour ID of the video you want to edit.
You will have access to all the new features, but if you save and exit the page and come back and go to Edit Photos/Video, you are going to see the old editor and certain things will not be there, like the text slides and floor plan images. So, just remember to use this special link to edit the video going forward.
I am really excited to announce some cool updates to the Single Property Website Tour. Click here to see a sample tour.
Updates include:
Centering of the tour on any web page (it used to be left justified)
Better fitting of the content to eliminate scrolling of the main content area
Cool wrap around styling of the content section headers
Ability to change the overall background color…so now you have two colors to showcase your brand and enhance the look of the tour. It makes the content really pop!
Ability to upload a background image – this could be the image of the property, a view of the area, or a custom branding image featuring your logo. For now, the custom background image only shows on the branded tour.
You can make these changes on a tour by tour basis, or in your profile to have them apply to all future tours.
A little tip. If you use Google’s Chrome browser, you can install a free “color picker” tool that allows you to get the color code for any color on any web page. Click here for a list of programs you can install for free to get the color code. Once you have the code, go to Edit Details on the Manage Tours page for a tour, or Edit Profile, and put the color either in the background 1 or background 2 spot. You can also do this for text. For example, this green is the color code #878f55
It is really simple to do and is another way you can really showcase your brand. The next training session will go over some advanced tour customization tricks. Click here to register…it is FREE!
We would love to hear feedback….please comment or post something in our support forum.
The FloorPlanOnline developers have been working like elves this holiday season. We just released what we call the “Tour Tweaks” case. The case is mainly some visual changes to the look and feel of the FloorPlanOnline tours based on feedback from our customers, including:
Your Photo and Contact info moved to the top left….and it always shows on the tour with your name in bold!
Your Logo moved to the top right
The top of the tour is cleaned up with the price, MLS, etc. moved to the Descriptions & Details
Ability to select the tour template (the layout and look) as your place an order – choose our Classic Tour 1.0 (our original tour design) or the Webpage 2.0 design (the current default tour with customizable colors and more integrated content).
Contact Pop-up now only shows when a user clicks on it. And, we have added a downloadable business card called a vCard. People can save your contact info, including your photo, into Outlook or Contacts (Apple users) with the click of a button.
On the Dashboard view, we have make the content “bright” by default, and when a user mouses over a media item, that section dims.
We have made it clearer that the Media icons on the left are clickable by changing the mouse icon to a hand. This is important for tours with a very light background color.
See an overview of these changes in this video.
A few things to note.
1. For best results, we suggest you re-upload your photo and your logo. Some of you may have your photo combined with your logo, which will still look fine, but if you want your photo next to your contact info, re-upload both. If you only upload your logo, you will end up with 2 photos showing on the tour.
2. Logos that are more square vs a long rectangle will look best.
3. We show 2 phone numbers on the face of the tour, then other numbers on the contact business card. If the 2 numbers you want are not showing, try selecting them, or changing them, in your profile.
If you have a particular color in your logo and you want to match that with the background color of your tour, you can do that. We suggest using either PhotoShop or PhotoShop Elements and the color eye-drop tool to get the right color code, or if you use Firefox for your browser, install the Colorzilla plugin (its free), and click on the color you want to use with Colorzilla, and then find the hex code (it will display at the bottom of your browser window), and update your tour and then your profile with that color code. It will start with a # and look something like #1D507D (each color has a different alpha-numeric code). Note, if you already have active tours, you need to edit the color in each tour for it to go into effect, as each tour can be independently edited. Once you edit your profile, the color should automatically apply for all future tours.


You must be logged in to post a comment.